AWS S3 HomeLab Part 10: CloudFront + HTTPS + Custom Domain
Take your S3 static site from "it works on HTTP" to production-grade: HTTPS everywhere, global CDN caching, private origin bucket, and your own domain name.
The Problem: S3 Website Endpoint Has No HTTPS
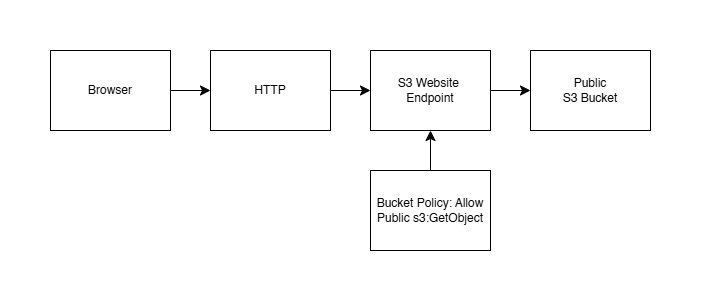
In Lesson 0006, you deployed a static site to S3. It worked — but it had three production gaps:
- No HTTPS. The S3 website endpoint (
bucket.s3-website-region.amazonaws.com) is HTTP-only. Browsers flag HTTP sites as "Not Secure." Some APIs refuse to load over HTTP. - No custom domain. Your URL was
bucket.s3-website-region.amazonaws.com, notwww.myapp.com. That's not user-facing. - Bucket must be public. Every object needed public-read permissions. That's fine for static assets, but it means your entire bucket is exposed — no private staging area, no gated content.
CloudFront solves all three. It sits in front of your S3 bucket and provides:
- TLS termination (HTTPS at the edge)
- Custom domain support (with Route 53 + ACM)
- Private origin (the S3 bucket stays private — only CloudFront can access it)
- Global CDN caching (600+ points of presence worldwide, lower latency)
Architecture: Before and After
Lesson 0006 architecture (development):
Lesson 0010 architecture (production):
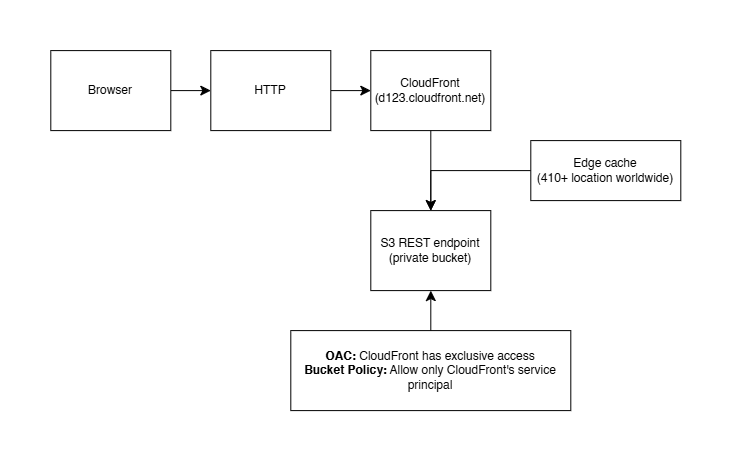
Notice the bucket is fully private in production. No public-read policy. No public access at all. CloudFront has exclusive access through an Origin Access Control (OAC), and the bucket policy grants access only to CloudFront's service principal.
Origin Access Control (OAC)
OAC is CloudFront's mechanism for authenticating to an S3 origin. It replaces the older Origin Access Identity (OAI), which only worked in the standard S3 REST endpoint. OAC supports all S3 regions, SSE-KMS, and dynamic requests.
How it works:
- You create an OAC in CloudFront and attach it to your distribution's origin
- CloudFront signs every request to S3 with the OAC's identity
- The S3 bucket policy allows access only for that specific OAC
- Direct access to S3 (bypassing CloudFront) is denied — the bucket stays private
The bucket policy for OAC looks like this:
{
  "Version": "2012-10-17",
  "Statement": [
    {
      "Sid": "AllowCloudFrontServicePrincipal",
      "Effect": "Allow",
      "Principal": {
        "Service": "cloudfront.amazonaws.com"
      },
      "Action": "s3:GetObject",
      "Resource": "arn:aws:s3:::MY_BUCKET/*",
      "Condition": {
        "StringEquals": {
          "AWS:SourceArn": "arn:aws:cloudfront::123456789012:distribution/EXYZABCDEFGHI"
        }
      }
    }
  ]
}
The AWS:SourceArn condition is critical — it restricts access to a specific CloudFront distribution. Without it, any CloudFront distribution could access your bucket.
OAI is deprecated for new deployments. Use OAC. The console prompts you to use OAC by default. OAI technically still works but lacks support for SSE-KMS, POST/PUT/PATCH/DELETE methods, and all regions.
Cache Behavior and TTL
CloudFront caches objects at edge locations based on cache behaviors and TTL (Time To Live) settings.
| Concept | What it means | Default |
|---|---|---|
| Cache behavior | Path-based rules that determine how CloudFront handles requests. You can have different rules for /images/*, /api/*, /*.html, etc. | One default behavior matching all paths (*) |
| Minimum TTL | The shortest time CloudFront will cache an object, regardless of what Cache-Control headers say | 0 seconds |
| Maximum TTL | The longest time CloudFront will cache an object, regardless of Cache-Control headers | 31536000 seconds (1 year) |
| Default TTL | How long CloudFront caches when the origin sends no Cache-Control header | 86400 seconds (24 hours) |
| Cache key | What makes a request "the same" for caching purposes. By default: URL path. You can add query strings, headers, cookies. | URL path only |
For a static site, a good starting configuration:
- HTML files — short cache (0–5 minutes). You want index.html updates to propagate quickly.
- CSS/JS/images — long cache (1 year). Use content-hashed filenames (
style.a1b2c3d.css) so new versions get new URLs. - API calls — no cache. Forward all headers and query strings; set TTL to 0.
Cache-Control headers from S3: You can set
Cache-Controlmetadata on individual S3 objects. CloudFront respects these headers (within Min/Max TTL bounds). Upload with:aws s3 cp index.html s3://bucket/ --cache-control "max-age=300"
Invalidation — Removing Cached Objects
When you update a file on S3, CloudFront edge caches still serve the old version until the TTL expires. Invalidation forces CloudFront to evict cached objects immediately.
aws cloudfront create-invalidation \
  --distribution-id EXXXXXXXXXXXXX \
  --paths "/index.html" "/assets/style.css"
Wildcard invalidation is supported:
aws cloudfront create-invalidation \
  --distribution-id EXXXXXXXXXXXXX \
--paths "/*"| Fact | Details |
|---|---|
| Cost | First 1,000 invalidation paths per month are free. Beyond that: $0.005 per path. /* counts as one path. |
| Speed | Invalidations typically complete in 60–300 seconds. Not instant. |
| Limit | Maximum 3,000 paths per invalidation request. Use wildcards for bulk operations. |
| Best practice | Use versioned filenames (content hashing) to avoid invalidation entirely. style.a1b2c3d.css never needs invalidation — it's a new URL. |
Custom Domain and HTTPS (ACM + Route 53)
To use your own domain (www.myapp.com) with CloudFront, you need:
- An ACM certificate — provisioned in us-east-1 (CloudFront's requirement for certificates). ACM automatically renews these certificates.
- DNS validation — ACM verifies you own the domain via a CNAME record in Route 53 (or email validation).
- A Route 53 alias record — an A record pointing
www.myapp.comto your CloudFront distribution's domain name. - Alternate domain names — listed in your CloudFront distribution config so CloudFront knows which domains to serve.
The full setup order:
1. Request ACM cert in us-east-1 → validate via Route 53 DNS
2. Create CloudFront distribution with the cert + alternate domain names
3. Create Route 53 ALIAS A record → CloudFront distribution
4. Wait for DNS propagation (usually minutes, can be hours)
Lab note: Setting up a custom domain requires you to own a domain and have it in Route 53. This lab uses the CloudFront default domain (
d123.cloudfront.net). Custom domain + ACM is documented above — you can add it whenever you have a domain ready. The rest of the architecture (OAC, caching, private bucket) works identically with or without a custom domain.
Custom Error Pages at CloudFront
Instead of relying on S3's website endpoint for error documents, CloudFront has its own custom error response feature:
# Custom error responses live inside the distribution config — there is no
# --custom-error-responses flag. Fetch the full config, add the block, re-apply:

aws cloudfront get-distribution-config --id EXXXXXXXXXXXXX --output json > cf-config.json

# Edit cf-config.json and set:
# "CustomErrorResponses": {
#   "Quantity": 1,
#   "Items": [{ "ErrorCode": 404, "ResponsePagePath": "/404.html", "ResponseCode": "404", "ErrorCachingMinTTL": 300 }]
# }
# Copy the ETag from the get-distribution-config response header, then apply:

aws cloudfront update-distribution --id EXXXXXXXXXXXXX \
  --distribution-config file://cf-config.json \
  --if-match "PASTE_ETAG"
This works even though the S3 REST endpoint would normally return an XML error for missing keys. CloudFront intercepts the 403/404 and serves your custom page instead.
| Error scenario | Without custom error pages | With custom error pages |
|---|---|---|
Missing page (/nonexistent) | S3 returns XML 404 → CloudFront returns XML 404 to browser | S3 returns 404 → CloudFront serves /404.html with 404 status |
Forbidden (/private/) | S3 returns XML 403 → CloudFront returns XML 403 to browser | S3 returns 403 → CloudFront serves /403.html with 403 status |
| Origin unreachable | CloudFront returns generic 502 | CloudFront serves /error.html with 502 status |
CloudFront Pricing Awareness
CloudFront pricing has four components. No need to memorize, but understand the shape:
| Component | What you pay for | Rough cost |
|---|---|---|
| Data transfer out | GB served from CloudFront edges to users | $0.085/GB (US), $0.12/GB (Asia). First 1 TB/month includes free tier discount. |
| HTTP/HTTPS requests | Number of requests hitting CloudFront | $0.0075–0.0125 per 10,000 requests |
| Invalidations | Paths invalidated beyond the free 1,000/month | $0.005 per path |
| Origin shield | Requests from regional caches to origin (optional — reduces origin load) | $0.01/GB |
For a learning/toy project, CloudFront costs are negligible (cents per month). For a production site, data transfer is the main cost driver — the CDN saves you money compared to serving directly from S3, because CloudFront's data transfer out to the internet is cheaper than S3's.
Lab: CloudFront in Front of a Private S3 Static Site
Take a static site from Lesson 0006, make the bucket fully private, and serve it through CloudFront with HTTPS. No public access — only CloudFront can talk to S3.
1. Create a private S3 bucket for the static site
aws s3api create-bucket \
  --bucket learn-devops-cf-YOURNAME-0010 \
  --region ap-southeast-1 \
  --create-bucket-configuration LocationConstraint=ap-southeast-1
Note: we are not enabling static website hosting — CloudFront works with the REST endpoint, not the website endpoint.
2. Create a simple static site
Create the two files that make up the site — index.html first, then 404.html.
<!DOCTYPE html>
<html lang="en">
<head>
  <meta charset="UTF-8">
  <meta name="viewport" content="width=device-width, initial-scale=1.0">
  <title>My CloudFront Site</title>
  <style>
    body { font-family: system-ui, sans-serif; max-width: 600px; margin: 4rem auto; padding: 0 1rem; line-height: 1.6; }
    h1 { color: #0066cc; }
    .badge { display: inline-block; background: #e8f4fd; color: #0066cc; padding: 0.25rem 0.75rem; border-radius: 1rem; font-size: 0.85rem; font-weight: 600; }
  </style>
</head>
<body>
  <h1>Served via CloudFront CDN</h1>
  <p>This page is hosted on S3 but delivered through CloudFront. The S3 bucket is <strong>completely private</strong> — only CloudFront can access it.</p>
  <p><span class="badge">HTTPS Enabled</span> <span class="badge">Global CDN</span> <span class="badge">Private Origin</span></p>
  <hr>
  <footer>
    <small>Served from CloudFront edge nearest to you. Every request is HTTPS-encrypted.</small>
  </footer>
</body>
</html>
Create 404.html.
<!DOCTYPE html>
<html lang="en">
<head><meta charset="UTF-8"><title>Page Not Found</title></head>
<body>
  <h1>404 — Page Not Found</h1>
  <p>The page you're looking for doesn't exist. This custom error page is served by CloudFront, not S3.</p>
  <p><a href="/">Go home</a></p>
</body>
</html>
3. Upload the site to S3
aws s3 cp index.html s3://learn-devops-cf-YOURNAME-0010/index.html
aws s3 cp 404.html s3://learn-devops-cf-YOURNAME-0010/404.html
Since there's no bucket policy and Block Public Access is enabled by default, this bucket is fully private. No one can access these objects directly.
4. Confirm the bucket is private
curl -I https://learn-devops-cf-YOURNAME-0010.s3.ap-southeast-1.amazonaws.com/index.htmlYou get 403 Forbidden. Direct access is denied. The REST endpoint requires authentication — exactly what we want.
5. Create an Origin Access Control (OAC)
aws cloudfront create-origin-access-control \
  --origin-access-control-config '{
    "Name": "s3-oac-learn-devops-0010",
    "SigningProtocol": "sigv4",
    "SigningBehavior": "always",
    "OriginAccessControlOriginType": "s3"
  }'
The response includes an Id — save it as OAC_ID. You'll use this when creating the CloudFront distribution.
6. Get your account ID and create the bucket policy for CloudFront
aws sts get-caller-identity --query Account --output textSave this. You'll also need the CloudFront distribution ID — but you don't have it yet. Generate the bucket policy file first with a placeholder, then update it after creating the distribution. Or use this policy that restricts to your account's CloudFront distributions:
{
  "Version": "2012-10-17",
  "Statement": [
    {
      "Sid": "AllowCloudFrontServicePrincipal",
      "Effect": "Allow",
      "Principal": {
        "Service": "cloudfront.amazonaws.com"
      },
      "Action": "s3:GetObject",
      "Resource": "arn:aws:s3:::learn-devops-cf-YOURNAME-0010/*",
      "Condition": {
        "ArnLike": {
          "AWS:SourceArn": "arn:aws:cloudfront::PASTE_ACCOUNT_ID:distribution/*"
        }
      }
    }
  ]
}
Using distribution/* as the source ARN is temporarily broad — it allows any CloudFront distribution in your account. After the lab, you can tighten this to a specific distribution ID.
7. Create the CloudFront distribution
This is the big step. CloudFront distributions take 5–15 minutes to deploy. Create the config file:
{
  "CallerReference": "learn-devops-0010-TIMESTAMP",
  "Origins": {
    "Quantity": 1,
    "Items": [
      {
        "Id": "S3-learn-devops-cf-YOURNAME-0010",
        "DomainName": "learn-devops-cf-YOURNAME-0010.s3.ap-southeast-1.amazonaws.com",
        "OriginAccessControlId": "PASTE_OAC_ID",
        "S3OriginConfig": {
          "OriginAccessIdentity": ""
        }
      }
    ]
  },
  "DefaultCacheBehavior": {
    "TargetOriginId": "S3-learn-devops-cf-YOURNAME-0010",
    "ViewerProtocolPolicy": "redirect-to-https",
    "AllowedMethods": {
      "Quantity": 2,
      "Items": ["GET", "HEAD"],
      "CachedMethods": {
        "Quantity": 2,
        "Items": ["GET", "HEAD"]
      }
    },
    "Compress": true,
    "ForwardedValues": {
      "QueryString": false,
      "Cookies": { "Forward": "none" }
    },
    "MinTTL": 0,
    "DefaultTTL": 300,
    "MaxTTL": 86400
  },
  "CustomErrorResponses": {
    "Quantity": 1,
    "Items": [
      {
        "ErrorCode": 404,
        "ResponsePagePath": "/404.html",
        "ResponseCode": "404",
        "ErrorCachingMinTTL": 60
      }
    ]
  },
  "Comment": "learn-devops-0010",
  "Enabled": true,
  "DefaultRootObject": "index.html",
  "HttpVersion": "http2",
  "PriceClass": "PriceClass_100"
}
Important fields explained:
- OriginAccessControlId — links the OAC you created. CloudFront uses it to sign S3 requests.
- ViewerProtocolPolicy: redirect-to-https — any HTTP request gets a 301 redirect to HTTPS.
- DefaultRootObject: index.html —
/serves index.html (same effect as S3 website hosting's index document). - PriceClass_100 — only North America + Europe edge locations (cheapest for learning).
- Compress: true — CloudFront gzips HTML/CSS/JS automatically.
Now create it (replace TIMESTAMP in the JSON with a unique value like the current epoch):
aws cloudfront create-distribution \
  --distribution-config file://cf-distribution-config.json
This returns a large JSON object. Find the DomainName (e.g., d1234567890.cloudfront.net) and Id (e.g., E1A2B3C4D5E6F7). Save both.
8. Wait for deployment and verify
Check the distribution status:
aws cloudfront get-distribution --id EXXXXXXXXXXXXX --query "Distribution.Status"When it shows "Deployed" (takes 5–15 minutes), test it:
curl -I https://d1234567890.cloudfront.net/
curl https://d1234567890.cloudfront.net/
You should see:
HTTP/2 200— the page loads via HTTPSx-cache: Miss from cloudfront— first request, not cached yet- The HTML content you wrote
- A second request should show
x-cache: Hit from cloudfront— it's cached at the edge
9. Test HTTPS enforcement
curl -I http://d1234567890.cloudfront.net/You should get 301 Moved Permanently with a Location: https://d1234567890.cloudfront.net/. HTTP is auto-redirected to HTTPS.
10. Test the custom 404 page
curl https://d1234567890.cloudfront.net/nonexistentYou should see your custom 404.html content (not the XML error from S3). CloudFront intercepted the 404 from S3 and served your error page.
11. Test cache invalidation
Update index.html on S3:
<h1>Updated via CloudFront Invalidation</h1>aws s3 cp index.html s3://learn-devops-cf-YOURNAME-0010/index.htmlImmediately after uploading, CloudFront may still serve the old cached version. Force an invalidation:
aws cloudfront create-invalidation \
  --distribution-id EXXXXXXXXXXXXX \
  --paths "/index.html"
Wait 1–2 minutes (check Status: InProgress → Completed), then curl again:
curl https://d1234567890.cloudfront.net/You should see the updated content. The invalidation forced CloudFront to re-fetch from S3.
12. Confirm the S3 bucket is still private
curl -I https://learn-devops-cf-YOURNAME-0010.s3.ap-southeast-1.amazonaws.com/index.htmlStill 403 Forbidden. The bucket is private. CloudFront is the only path to these objects — and it enforces HTTPS. This is the production architecture.
13. Cleanup
Delete the CloudFront distribution first (it must be disabled before deletion), then the S3 bucket:
E_ID="EXXXXXXXXXXXXX"
BUCKET="learn-devops-cf-YOURNAME-0010"

# NOTE: PowerShell Out-File defaults to UTF-16, which breaks JSON parsing in the
# AWS CLI. Always use -Encoding utf8. The ETag is returned in the response HEADER
# of get-distribution-config, not inside the saved JSON file:

aws cloudfront get-distribution-config --id $E_ID --output json | Out-File cf-config.json -Encoding utf8

# Disable the distribution by editing cf-config.json: change "Enabled": true to false
# Then update and delete (each config change returns a new ETag):

aws cloudfront update-distribution --id $E_ID --distribution-config file://cf-disabled-config.json --if-match "PASTE_ETAG"

aws cloudfront delete-distribution --id $E_ID --if-match "PASTE_ETAG"

aws s3 rm s3://$BUCKET/ --recursive
aws s3api delete-bucket --bucket $BUCKET

aws cloudfront delete-origin-access-control --id "PASTE_OAC_ID"
Disabling and deleting a CloudFront distribution requires its current ETag from get-distribution-config. Each config change returns a new ETag.
Mission connection: This is the production upgrade for Project #1 (static site). With CloudFront, your site has HTTPS, global edge caching, a private S3 origin, and custom error pages — everything needed for a user-facing deployment. The only remaining piece is a custom domain (ACM + Route 53), which you can add when you have a domain in Route 53. For Project #2 (backups), CloudFront is less relevant — but the architecture pattern (public frontend, private origin) applies to any content delivery scenario.
When to Use CloudFront vs. S3 Alone
Use CloudFront when the site is user-facing — you need HTTPS, a custom domain, global edge caching, or a private origin bucket. Use S3 alone for internal tools, quick prototypes, or cost-sensitive projects where an extra moving part isn't worth it.
- CloudFront: HTTPS out of the box, custom domain via ACM + Route 53, caching with invalidation, and the bucket stays private
- S3 alone: simpler, no distribution to manage, slightly cheaper at tiny scale — but the website endpoint is HTTP-only, no edge cache, and the bucket must be public
| Scenario | Use S3 alone | Use CloudFront + S3 |
|---|---|---|
| Internal tool, accessed via VPN/AWS | Fine — HTTP is acceptable, latency isn't critical | Overkill for internal-only access |
| Public-facing static site | No — no HTTPS, ugly domain, no caching | Yes — this is the standard architecture |
| Serving API responses | No — S3 can't run code | No — CloudFront caches static content, APIs need compute |
| Serving large media files globally | No — high latency for distant users | Yes — edge caching reduces latency dramatically |
| Development / testing | Yes — S3 website endpoint is quick to set up | Wait until you need HTTPS or caching |
| Private document sharing | No (use pre-signed URLs) | No (use pre-signed URLs or CloudFront signed URLs) |